Integrate with GitHub Enterprise Server
Support level: Community
What is GitHub Enterprise Server?
GitHub Enterprise Server is the self-hosted version of GitHub Enterprise. It is installed on-premises or on a private cloud and provides organizations with a secure and customizable source code management and collaboration platform.
Preparation
The following placeholders are used in this guide:
github.companyis the FQDN of your GitHub Enterprise Server installation.authentik.companyis the FQDN of the authentik installation.GitHub Usersis an application entitlement used for standard GitHub Enterprise Server users.GitHub Adminsis an application entitlement used for GitHub Enterprise Server administrators.
This documentation lists only the settings that you need to change from their default values. Be aware that any changes other than those explicitly mentioned in this guide could cause issues accessing your application.
authentik configuration
To support the integration of GitHub Enterprise Server with authentik, you need to create an application/provider pair in authentik. If you want to use SCIM provisioning, you also need to create application entitlements and a SCIM property mapping.
Create an application and provider
authentik 2026.5 introduces changes to how the SAML provider behaves. Specifically, the provider now automatically sets the Issuer value to: https://authentik.company/application/saml/<application_slug>/metadata/
Older versions of authentik set this value to authentik by default. If you're running an older version, please set Issuer to https://authentik.company/application/saml/<application_slug>/metadata/, where <application_slug> is the slug that you selected for the application.
-
Log in to authentik as an administrator and open the authentik Admin interface.
-
Navigate to Applications > Applications and click New Application to create an application and provider pair. (Alternatively you can first create a provider separately, then create the application and connect it with the provider.)
- Application: provide a descriptive name, an optional group for the type of application, the policy engine mode, and optional UI settings. Note the application Slug, because it is required later.
- Choose a Provider type: select SAML Provider as the provider type.
- Configure the Provider: provide a name (or accept the auto-provided name), the authorization flow to use for this provider, and the following required configurations.
- Set ACS URL to
https://github.company/saml/consume. - Set Audience to
https://github.company. - Under Advanced protocol settings:
- Select an available Signing certificate. Download this certificate because it is required later.
- Set NameID Property Mapping to
authentik default SAML Mapping: Username.
- Set ACS URL to
- Configure Bindings (optional): you can create a binding (policy, group, or user) to manage the listing and access to applications on a user's Application Dashboard page. If you add the SCIM provider as a backchannel provider later, only users who can view this application are synchronized.
-
Click Submit to save the new application and provider.
Create application entitlements (optional)
Create application entitlements if you want authentik to provision GitHub Enterprise Server user roles with SCIM.
- In the authentik Admin interface, open the GitHub Enterprise Server application that you created.
- Click the Application entitlements tab.
- Create two entitlements named
GitHub UsersandGitHub Admins. - Open each entitlement and bind the users or groups that should receive it.
Create a SCIM property mapping (optional)
-
In the authentik Admin interface, navigate to Customization > Property Mappings and click Create.
-
Select SCIM Provider Mapping and click Next.
-
Create a mapping for GitHub roles:
-
Name:
GitHub roles -
Expression:
The supported
rolesvalues are documented in GitHub Enterprise Server's SCIM API documentation.entitlement_names = {entitlement.namefor entitlement in request.user.app_entitlements(provider.application)}roles = []if "GitHub Admins" in entitlement_names:roles.append({"value": "enterprise_owner", "primary": True})elif "GitHub Users" in entitlement_names:roles.append({"value": "user", "primary": True})return {"roles": roles,}
-
-
Click Finish.
GitHub Enterprise Server configuration
Create the SCIM token (optional)
Complete this section if you want to use SCIM provisioning.
- Create or use a built-in enterprise owner account that is not managed through SCIM. GitHub recommends the username
scim-admin. - Log in to GitHub Enterprise Server with the built-in setup user.
- Navigate to
https://github.company/settings/tokens. - Generate a new classic personal access token with the
scim:enterprisescope and no expiration. - Copy the token. This value is used in the authentik SCIM provider.
Configure SAML
- Navigate to the GitHub Enterprise Server Management Console at
https://github.company:8443. - Sign in as an administrator.
- Go to Authentication.
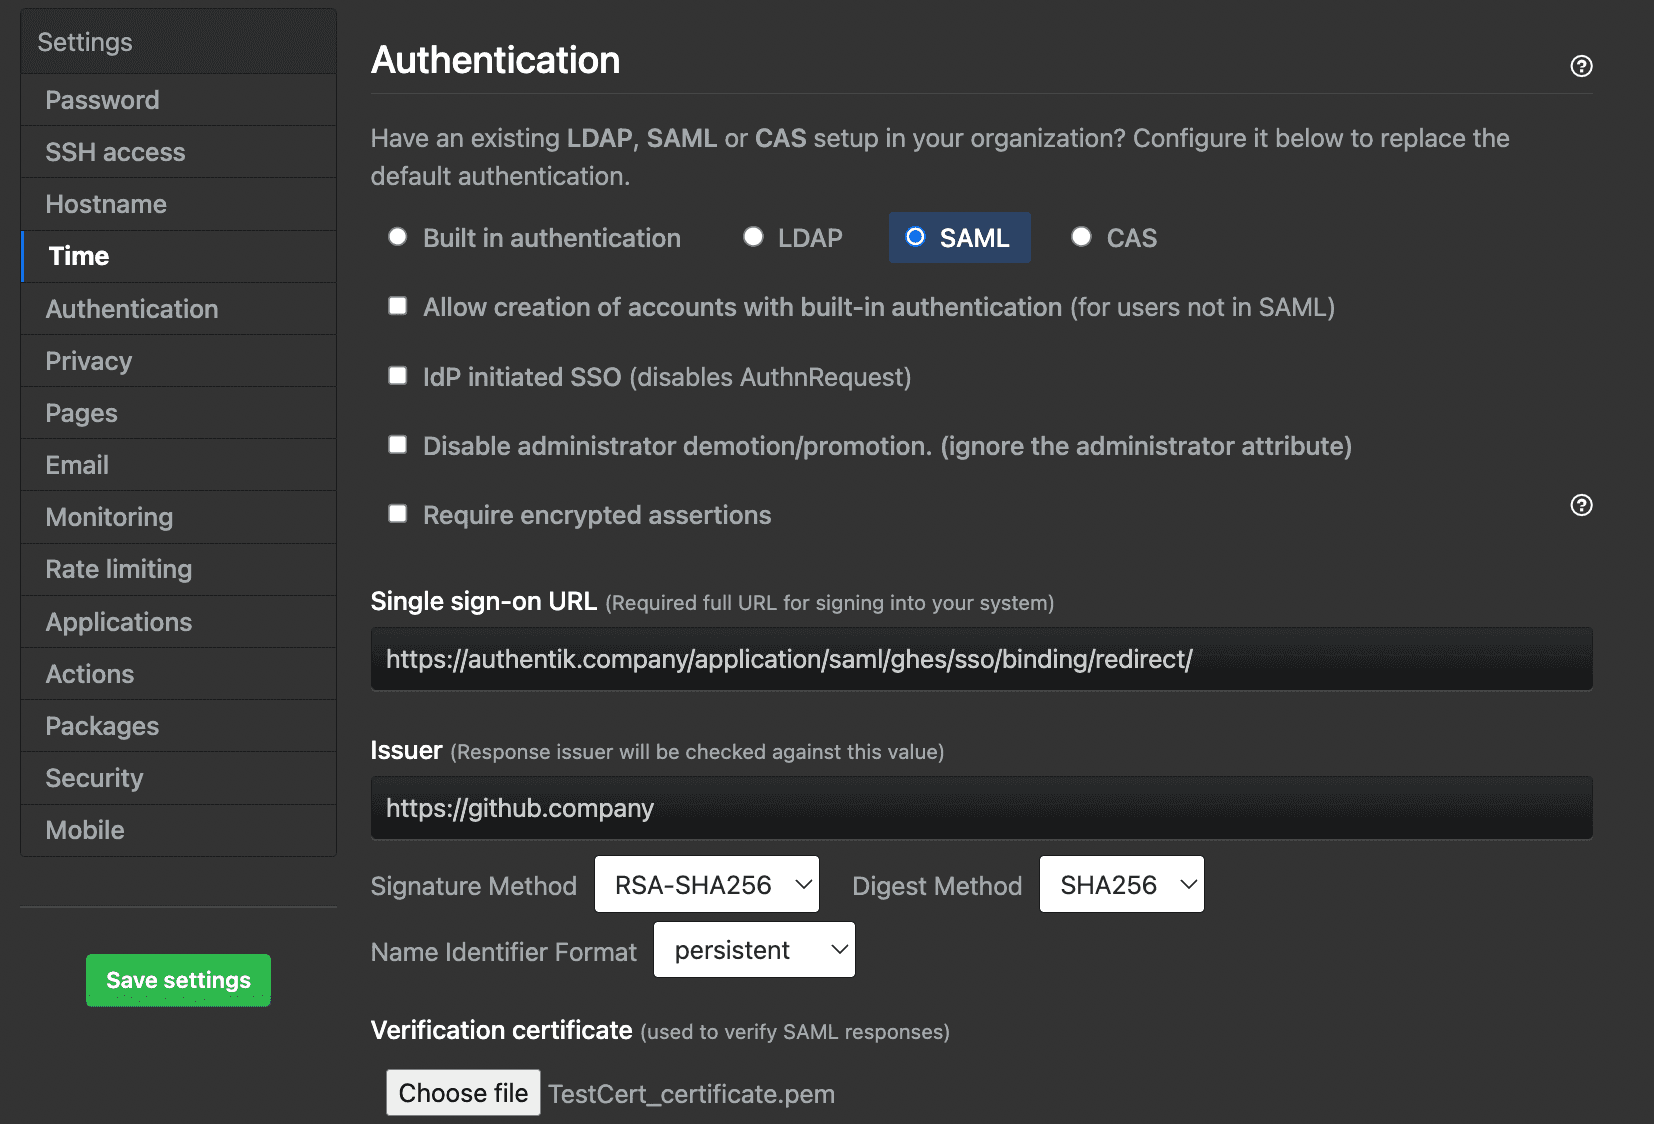
- Configure the following settings:
- Select SAML.
- Single sign-on URL: enter the SAML Endpoint from the SAML provider that you created in authentik.
- Issuer:
https://authentik.company/application/saml/<application_slug>/metadata/. - Signature method and Digest method: select the methods that match the authentik SAML provider settings.
- Verification certificate: upload the signing certificate that you downloaded from authentik.
- If you plan to use SCIM, select Allow creation of accounts with built-in authentication and Disable administrator demotion/promotion.
- In the User attributes section, do not configure a different username attribute unless it returns the same value as the SCIM
userNameattribute.
- Click Save settings and wait for the changes to apply.
Enable SCIM (optional)
Complete this section if you want to use SCIM provisioning.
- Log in to GitHub Enterprise Server with the built-in setup user.
- In the upper-right corner, click your profile picture, then click Enterprise settings.
- Click Settings > Authentication security.
- Select Enable SCIM configuration.
- Click Save.
Create a SCIM provider (optional)
- In the authentik Admin interface, navigate to Applications > Providers and click Create.
- Select SCIM Provider as the provider type and click Next.
- Configure the following settings:
- Name: provide a descriptive name.
- URL:
https://github.company/api/v3/scim/v2 - Token: paste the GitHub personal access token that you created earlier.
- User Property Mappings: keep
authentik default SCIM Mapping: Userselected, then add theGitHub rolesmapping that you created earlier. - Group Property Mappings: keep
authentik default SCIM Mapping: Groupselected.
- Click Finish.
- Navigate to Applications > Applications and open the GitHub Enterprise Server application.
- Add the SCIM provider to Backchannel Providers.
- Click Update.
Update GitHub Enterprise Server settings (optional)
Complete this section after SCIM sync is working if you use SCIM provisioning.
- Navigate to the GitHub Enterprise Server Management Console at
https://github.company:8443. - Sign in as an administrator.
- Go to Authentication.
- Clear Disable administrator demotion/promotion.
- If you want all users to be provisioned from authentik, clear Allow creation of accounts with built-in authentication.
- Click Save settings and wait for the changes to apply.
Configuration verification
To confirm that authentik is properly configured with GitHub Enterprise Server, log out of GitHub Enterprise Server and open GitHub Enterprise Server. It should redirect you to authentik for SAML authentication.
If you configured SCIM provisioning, assign a test user to the GitHub Users entitlement and ensure that the user can view the application in authentik. Open the SCIM provider and click Run sync again. After the sync completes, confirm that the user is provisioned in GitHub Enterprise Server.